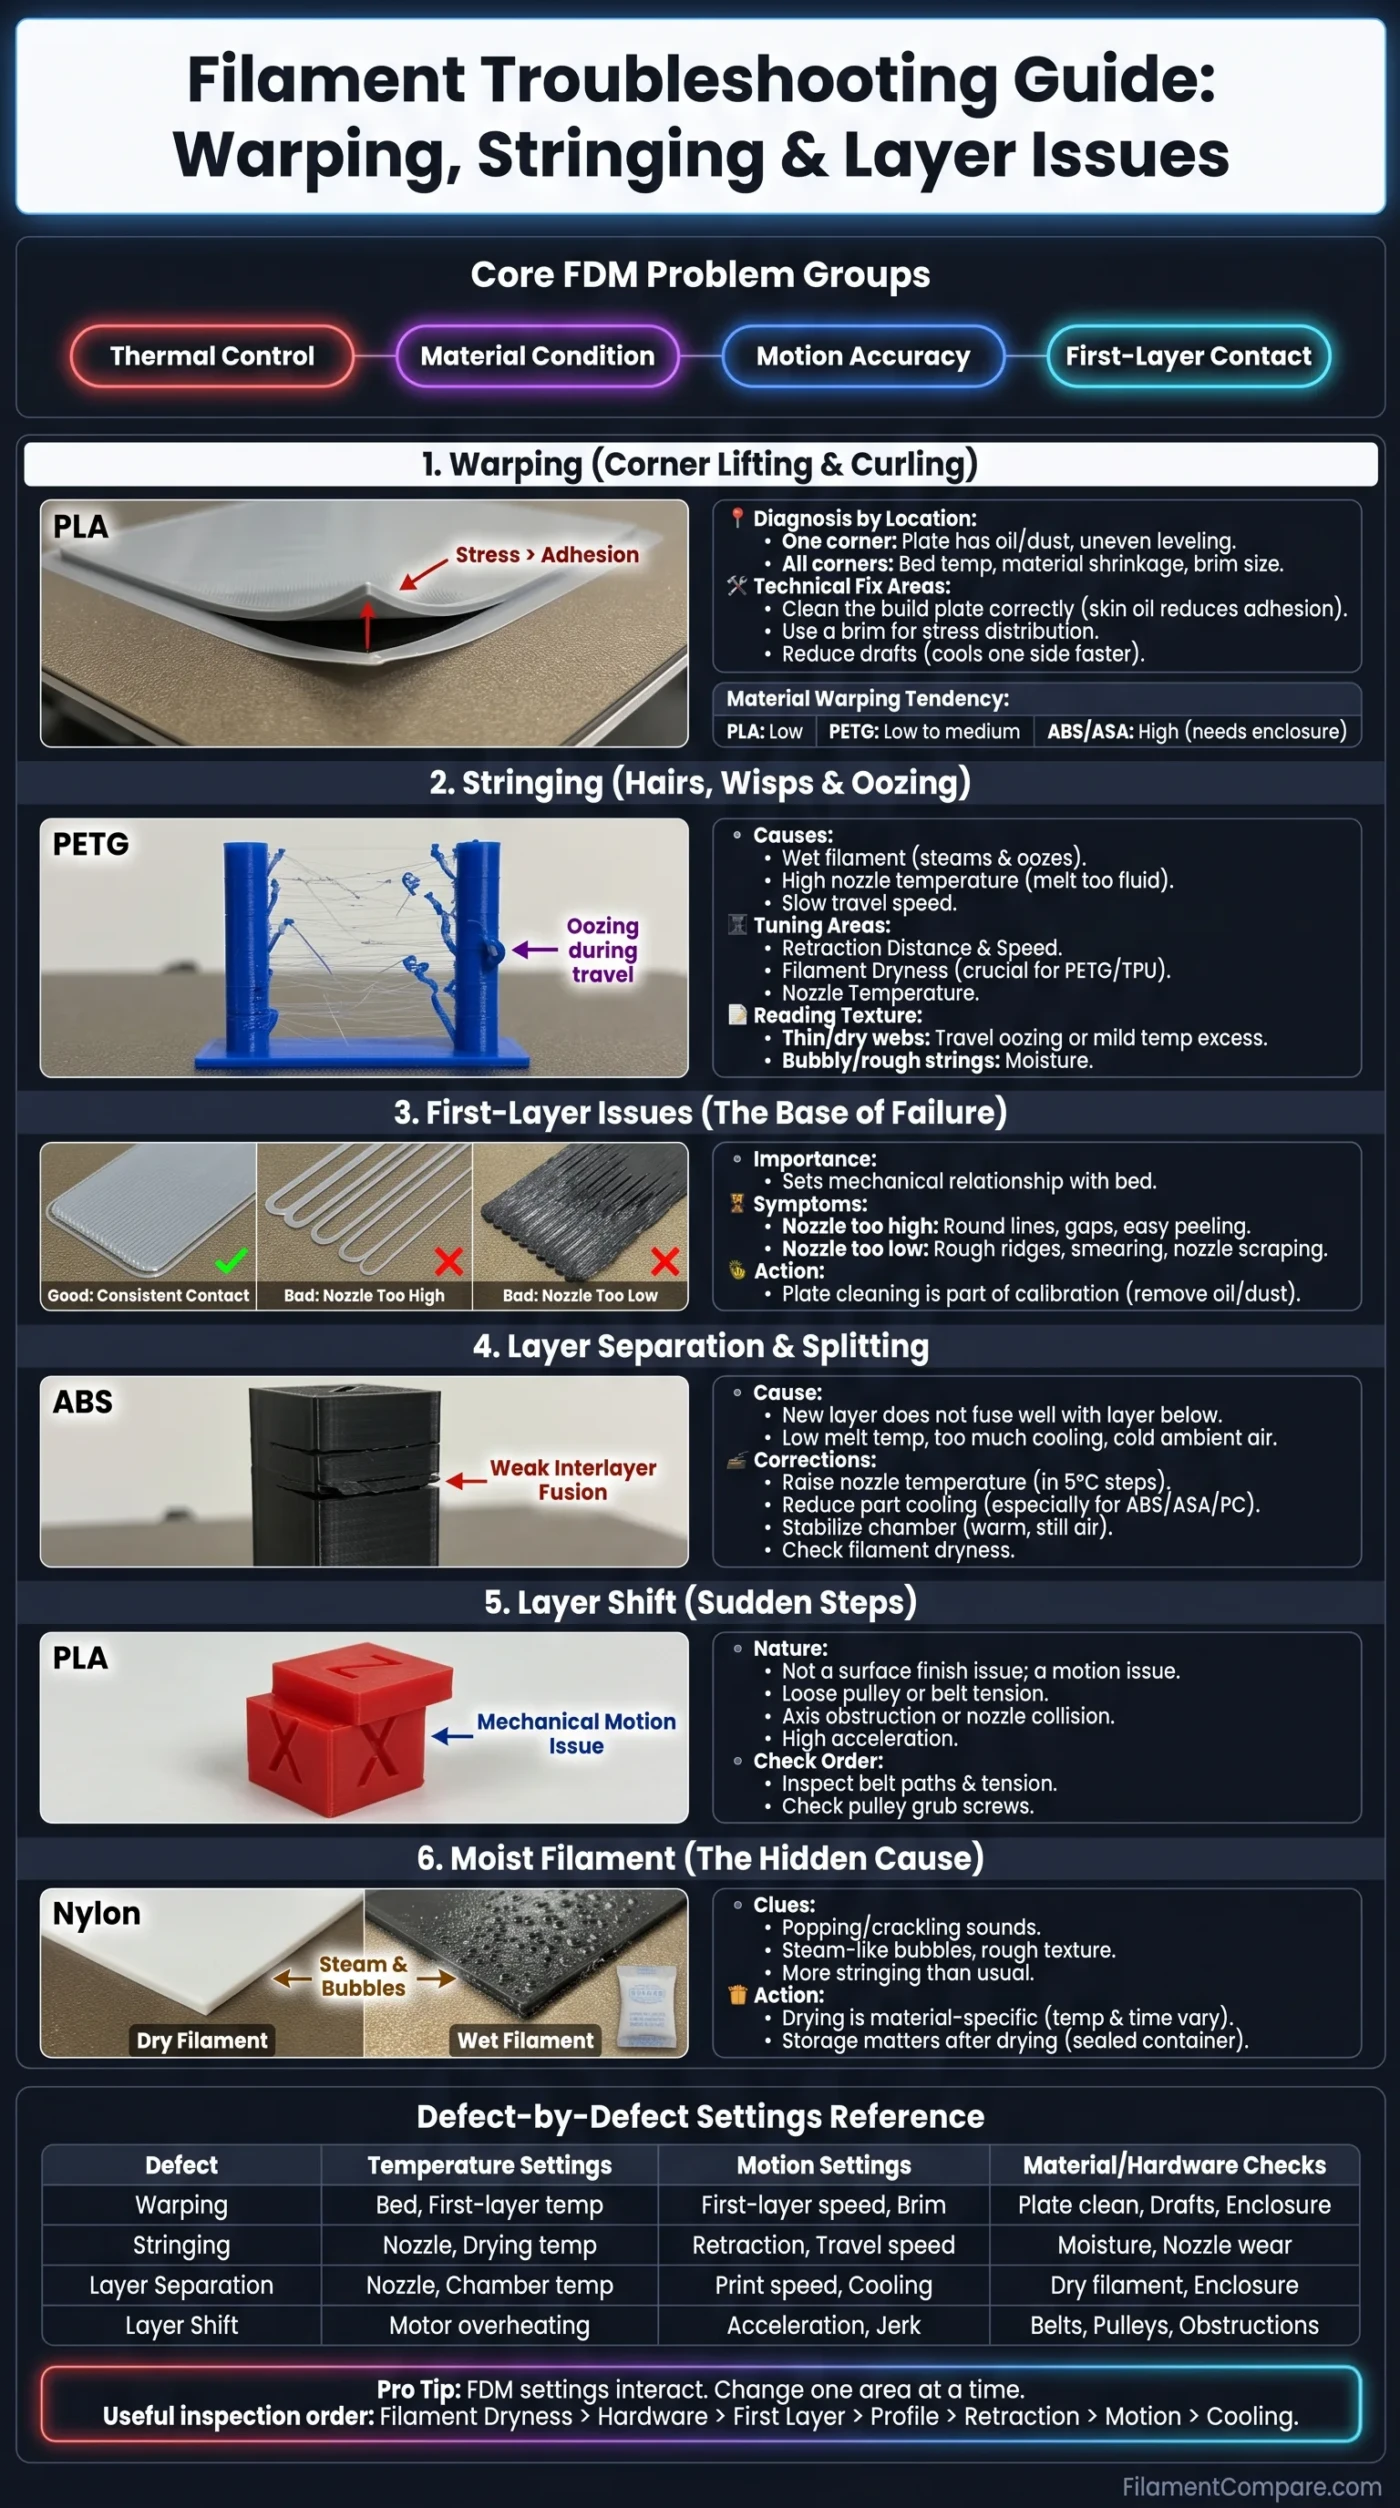
Most FDM print defects look random at first, yet the pattern usually points to a small group of causes. Warping often starts at the bed. Stringing often starts in the hot end. Layer issues can come from temperature, motion, flow, cooling, filament moisture, or the model geometry itself.
| Print Symptom | What It Looks Like | Most Likely Cause Area | First Values to Review |
|---|---|---|---|
| Warping | Corners lift from the build plate; the bottom edge bends upward. | Build plate adhesion, cooling shrinkage, bed temperature, drafts, sharp corners. | Bed temperature, first-layer height, build plate cleanliness, brim width, enclosure use. |
| Stringing | Thin hairs or threads appear between separate print features. | Oozing during travel moves, wet filament, high nozzle temperature, weak retraction tuning. | Nozzle temperature, retraction distance, retraction speed, travel speed, filament dryness. |
| Weak Layer Bonding | Layers split, crack, or separate when the part cools or is flexed. | Low melt temperature, too much cooling, cold ambient air, poor interlayer fusion. | Nozzle temperature, fan speed, chamber stability, print speed, filament profile. |
| Layer Shift | The model suddenly steps sideways on the X or Y axis. | Skipped motor steps, loose pulley, belt tension, axis obstruction, nozzle collision. | Belt path, pulley grub screws, acceleration, jerk, travel clearance, axis movement. |
| First-Layer Failure | Lines do not stick, look round, smear badly, or detach during early layers. | Z-offset, bed leveling, surface contamination, incorrect plate/filament pairing. | Z-offset, mesh bed leveling, bed cleaning, first-layer speed, first-layer temperature. |
| Gaps and Under-Extrusion | Walls look thin; top surfaces show holes; layers have missing material. | Partial clog, low temperature, incorrect filament diameter, flow calibration, feeder slip. | Flow ratio, nozzle condition, filament path, extruder tension, hot-end temperature. |
Material profiles matter. PLA, PETG, TPU, ASA, ABS, PA, PC, and composite filaments do not fail in the same way. A setting that improves PLA stringing may reduce layer bonding on ASA or nylon. Always treat a slicer profile as material-specific, not universal.
Troubleshooting Starts With the Failure Pattern
A clean diagnosis begins with the visible shape of the defect. A lifted corner is not the same problem as a shifted layer. Thin hairs between towers do not point to the same cause as rough top skin. The printer gives clues.
Most FDM problems sit in four groups: thermal control, material condition, motion accuracy, and first-layer contact. When those groups are separated, troubleshooting becomes much easier. No guessing loop. No random slicer changes.
- Thermal shrinkage
- Bed adhesion
- Retraction tuning
- Flow calibration
- Cooling balance
- Axis movement
- Moisture control
Warping: Corner Lifting, Curling, and Bed Release
Warping happens when cooling plastic contracts and pulls against the layers below it. The print wants to shrink; the build plate tries to hold it flat. If the stress becomes stronger than bed adhesion, the corners lift. Large flat parts show it first, especially parts with sharp corners and long straight edges.
Bambu Lab describes model warping and falling off as a problem linked to shrinkage during printing and insufficient adhesion to the build plate.[a] Prusa also lists warping among common print-quality problems, especially on larger objects and higher-temperature materials.[b]
Why Some Filaments Warp More Than Others
Warping is stronger when a material has higher thermal contraction, needs a hotter bed, or loses heat unevenly. PLA is usually easier to keep flat because it prints at lower temperatures and bonds well to many common plates. PETG can be stable, but it may need a clean surface and correct release layer depending on the plate. ABS, ASA, PA, and PC often need a warmer and more stable print environment.
| Filament | Typical Nozzle Range | Typical Bed Range | Warping Tendency | Print Environment Notes |
|---|---|---|---|---|
| PLA | 185–235 °C | 50–60 °C | Low | Stable room air usually works; too much heat can soften small details. |
| PETG | 215–270 °C | 70–90 °C | Low to medium | Clean plate and moderate cooling help; wet PETG can string heavily. |
| ASA | 220–275 °C | 90–110 °C | Medium to high | Enclosure is recommended for stable layer bonding and corner control. |
| ABS | 230–255 °C | 95–110 °C | High | Warm, draft-free enclosure improves dimensional stability. |
| PA / Nylon | 240–285 °C | 70–115 °C | Medium to high | Dry storage, dry printing, and stable chamber temperature matter. |
| TPU / Flex | 220–260 °C | 40–85 °C | Low | Slow speed and controlled extrusion matter more than bed heat. |
The temperature ranges above follow Prusa’s material reference ranges for common FDM filaments.[c] Real values change with brand, colorant, nozzle type, hot-end design, part size, and build plate surface.
Bed Adhesion Is Not Just Stickiness
A part can stick well at the start and still warp later. That is why bed adhesion has three parts: surface contact, thermal grip, and stress control. Surface contact comes from the first layer. Thermal grip comes from the bed holding the lower layers warm enough. Stress control comes from cooling, part shape, chamber temperature, and print orientation.
Warping Diagnosis by Location
- Only one corner lifts: the plate may have oil, dust, uneven leveling, or localized cooling from airflow.
- All corners lift: bed temperature, material shrinkage, brim size, or chamber stability is likely involved.
- Edges curl upward during upper layers: part cooling may be too strong, overhangs may be curling, or the nozzle may be reheating raised edges.
- The whole part pops off mid-print: first-layer contact, plate preparation, and thermal stress should be checked together.
Technical Fix Areas for Warping
The best correction depends on the material. PLA usually responds well to a clean plate, correct Z-offset, moderate bed heat, and a sensible brim. ASA and ABS often need an enclosure because the problem is not only bottom adhesion; it is uneven cooling through the whole part.
- Clean the build plate correctly: skin oil can reduce adhesion even when the plate looks clean.
- Review the first-layer height: round, loose lines do not create enough contact; a smashed layer can cause elephant’s foot and poor dimensional accuracy.
- Use a brim for stress distribution: a brim increases edge contact and spreads lifting force over a wider area.
- Reduce drafts: air from a fan, open window, or HVAC vent can cool one side faster than the other.
- Use rounded corners when the design allows it: sharp corners concentrate shrinkage stress.
- Match the plate to the filament: textured PEI, smooth PEI, engineering plates, glue stick, and release layers behave differently.
Stringing: Hairs, Wisps, and Oozing Between Moves
Stringing appears when molten filament leaks from the nozzle during travel moves. A clean travel move should cross open space without leaving a thread. When the nozzle oozes, that thread cools into a fine hair between towers, posts, text, holes, or separate model islands.
MatterHackers describes stringing as filament continuing to ooze from the nozzle during non-print moves, with retraction calibration, faster non-print moves, dry filament, and temperature adjustment listed among the relevant correction areas.[d]
Stringing Has More Than One Cause
Retraction gets most of the attention, but it is only one part of the system. Wet filament can steam and ooze. High nozzle temperature can keep the melt too fluid. Slow travel gives the nozzle more time to drip. A worn nozzle can leave a less controlled bead. PETG, TPU, and nylon can show more fine hairs than PLA because their melt behavior and moisture sensitivity are different.
- Retraction Distance
- Pulls filament back before travel. Bowden systems usually need more distance than direct-drive extruders.
- Retraction Speed
- Controls how fast the filament is pulled back. Too low can be weak; too high can grind soft filament or cause inconsistent feeding.
- Travel Speed
- Shortens the time the nozzle spends crossing open space. Faster travel can reduce visible hairs when motion remains accurate.
- Nozzle Temperature
- Affects melt viscosity. Too hot often increases oozing; too cold can reduce layer bonding or cause under-extrusion.
- Wipe, Coasting, and Avoid Crossing Perimeters
- Slicer features that manage pressure or travel path. They help most when basic temperature and retraction are already close.
Reading Stringing by Texture
Thin, dry-looking spiderwebs often point to travel oozing or mild temperature excess. Thicker elastic strands can point to PETG, TPU, or a filament that is printing too hot. Bubbly, rough, uneven strings suggest moisture. Tiny hairs on only one side of the model can also come from part cooling direction or travel path behavior.
Not every hair means the print profile is wrong. Some materials naturally leave occasional wisps on fine travel-heavy geometry. The goal is controlled printing, not chasing a perfect setting that damages layer strength. Small hairs can be removed. Weak walls are worse.
Stringing Fix Areas by Material
| Filament | Common Stringing Pattern | Setting Areas to Inspect | Material-Specific Note |
|---|---|---|---|
| PLA | Fine hairs between towers or small posts. | Nozzle temperature, retraction, travel speed, cooling. | Often improves with a small temperature reduction if layer bonding stays clean. |
| PETG | Glossy strings, small blobs, nozzle buildup. | Dryness, temperature, retraction, travel path, flow ratio. | Can string even with a good profile; dry filament changes the result a lot. |
| TPU | Elastic strands and small surface zits. | Slow speed, low retraction force, direct-drive path, moisture. | Too much retraction can stretch or buckle flexible filament. |
| Nylon | Wispy strings, steam marks, rough texture. | Drying, dry box printing, temperature, chamber stability. | Moisture control is often more important than retraction changes. |
| ASA / ABS | Less hairing than PETG, but blobs can appear near seams. | Temperature, seam placement, pressure advance, enclosure temperature. | Reducing temperature too far can weaken layer bonding. |
First-Layer Issues: The Base of Most Print Failures
The first layer sets the print’s mechanical relationship with the bed. If the nozzle is too high, filament lands as round lines with weak contact. If the nozzle is too low, the filament smears, ridges form, and the extruder may struggle. Both can look like adhesion trouble. They are different problems.
Bambu Lab’s first-layer troubleshooting material puts calibration, plate condition, and first-layer inspection at the center of solving early print failures.[e] Prusa also describes first-layer issues as one of the most common 3D printing problems because the first layer is the base of the object.[f]
What a Good First Layer Looks Like
A good first layer has visible paths, but the lines join cleanly. The surface should not look like separate loose ropes. It should not look crushed into rough ridges either. Consistent contact matters more than a perfectly glossy bottom.
- Nozzle too high: round lines, poor edge contact, gaps between adjacent paths, easy peeling.
- Nozzle too low: rough ridges, translucent smearing, nozzle scraping, feeder clicking on some machines.
- Bed not level or mesh not accurate: one side sticks well while another side looks loose or over-compressed.
- Dirty plate: random islands of poor adhesion, often where fingers touched the surface.
- First layer too fast: corners and small details fail before the next layer can lock them in.
Build Plate Surface and Filament Pairing
Build plates are not all-purpose surfaces. Smooth PEI, textured PEI, glass, coated flexible plates, engineering plates, and adhesive-assisted surfaces all behave differently. PETG can bond too firmly to some smooth surfaces, while nylon may need a dedicated adhesive layer. The right surface reduces both failed adhesion and over-adhesion.
Plate cleaning is part of calibration. A printer can be mechanically perfect and still fail if the surface has oil, dust, old glue, or incompatible residue. The first layer is physical contact, not just a slicer setting.
Layer Separation and Splitting
Layer separation means the new layer does not fuse well enough with the layer below it. It can show as horizontal cracks, weak walls, brittle parts, or gaps that appear during cooling. This is common when the polymer is not hot enough at the moment of bonding or when airflow removes heat too quickly.
Prusa describes FDM layer separation as de-lamination of printed layers and links it mostly to incorrect profiles, wrong temperatures, or excessive cooling.[g] MatterHackers also lists low print temperature, too much cooling, cold uneven ambient air, and high print speed as causes for layer separation or warping within the part.[h]
Layer Adhesion Is a Thermal Event
Each new extrusion line must be warm enough to soften and bond with the previous layer. If the nozzle temperature is too low, the layer lands but does not weld well. If the fan is too strong, the previous layer may be too cold. If print speed is too high, the material may not spend enough time in the hot end to reach a stable melt state.
For small PLA parts, strong cooling helps detail. For ABS, ASA, PC, and nylon, too much cooling can reduce layer strength and increase splitting. Same fan. Different result.
Common Layer Bonding Corrections
- Raise nozzle temperature in small steps: a 5 °C change can affect bonding, surface gloss, and stringing.
- Reduce part cooling: especially for ABS, ASA, PA, PC, and tall parts with visible cracks.
- Lower print speed: this gives the hot end more time to melt material and gives each line more contact time.
- Stabilize the chamber: warm, still air reduces thermal shock in higher-shrink materials.
- Check filament dryness: moisture can create bubbles, rough walls, weak layers, and inconsistent extrusion.
- Increase wall count when needed: more perimeters can improve strength when the model is load-bearing.
Layer Shift: Sudden Steps in X or Y
A layer shift is not a surface finish issue. It is a motion issue. The printer tries to continue the model, but one axis has lost position. The result is a sudden staircase step, usually on X, Y, or both.
Prusa notes that layer shifting is usually associated with abnormal movement and recommends checking free movement, obstructions, pulleys, motor mounting, belt alignment, and pulley grub screws. A loose or misaligned pulley is described as a common cause of staircase layer shifts.[i]
Mechanical Sources of Layer Shift
- Loose pulley: the motor shaft turns, but the belt pulley slips.
- Incorrect belt tension: a loose belt can skip teeth; an overly tight belt can add friction and strain.
- Axis obstruction: a cable, stray filament piece, binder clip, or raised print edge can block motion.
- Nozzle collision: curled edges, over-extrusion, or insufficient Z-hop can let the nozzle hit the part.
- High acceleration: aggressive movement can exceed what the printer can repeat reliably.
- Unstable printer surface: vibration and wobble can make motion problems more visible.
Layer Shift Versus Ringing
Layer shift moves the whole upper section sideways. Ringing creates repeated waves near sharp corners, but the model stays aligned. These two defects are often confused. A shifted model has a hard step; ringing has echo-like ripples.
Motion Check Order
- Move the X and Y axes by hand with motors disabled and feel for rough spots.
- Inspect belt paths for debris, rubbing, uneven tension, and damaged teeth.
- Check pulley set screws and confirm one screw is tightened against the flat side of the motor shaft.
- Review acceleration and travel speed if shifts appear only on fast sections.
- Inspect the printed part for curled edges that could be struck by the nozzle.
Under-Extrusion, Over-Extrusion, and Flow-Related Layer Issues
Flow problems can imitate many other failures. Under-extrusion can look like weak layer bonding, gaps in walls, or rough top surfaces. Over-extrusion can cause ridges, blobs, nozzle drag, rough seams, and even layer shifts if the nozzle collides with raised material.
Under-Extrusion Signs
Under-extrusion means the printer is laying down less plastic than expected. The print may have missing lines, weak perimeters, sparse top surfaces, or a rough matte texture. MatterHackers lists incorrect filament diameter, low extrusion temperature, and nozzle or extruder issues among under-extrusion causes.[j]
- Partial nozzle clog or heat-creep restriction.
- Printing temperature too low for the material and speed.
- Incorrect filament diameter value in the slicer.
- Feeder gear packed with filament dust.
- Extruder tension too low or too high.
- Volumetric flow limit exceeded on fast infill or thick layers.
Over-Extrusion Signs
Over-extrusion means too much material is being deposited. It can create raised ridges, rough top layers, elephant’s foot, seam blobs, dimensional inaccuracy, and nozzle scraping. On grid infill, extra material can build up at crossings and create hard nozzle impacts. Small error. Loud scrape.
- Flow ratio or extrusion multiplier too high.
- First-layer flow too aggressive.
- Filament diameter not measured correctly.
- Pressure advance or linear advance not tuned for the filament.
- Nozzle wear increasing the real extrusion width.
Moist Filament: The Hidden Cause Behind Many Defects
Moisture does not create only one symptom. It can create stringing, popping sounds, rough surfaces, inconsistent extrusion, weak layer bonding, bubbles, cloudy walls, and small zits. Hygroscopic materials such as nylon, TPU, PVA, BVOH, and some PETG blends need more careful storage than PLA.
Wet filament can still print, but the result may look like a slicer problem. That is why retraction tuning alone can feel endless when the spool is the real issue.
Moisture Clues During Printing
- Small popping or crackling sounds from the nozzle.
- Steam-like bubbles in the extrusion path.
- More stringing than the same profile produced before.
- Rough, foamy, or uneven surface texture.
- Weak layers even when temperature is within the normal range.
- Flexible or nylon filament behaving inconsistently across the same print.
Drying Is Material-Specific
Do not use one drying temperature for every spool. PLA can soften or deform on the spool if dried too hot. Nylon and PC usually need more heat and time. TPU needs care because it can absorb moisture but also deform if overheated. Manufacturer spool and filament limits should lead the choice.
Storage matters after drying. A dry box, sealed container, desiccant, and short air exposure are often more useful than repeatedly changing slicer settings.
Blobs, Zits, and Seam Marks
Blobs are small extra deposits of material. They often appear near the Z seam, travel start or stop points, retraction recovery, pressure changes, or areas where the nozzle pauses. Some seam visibility is normal in FDM printing. The goal is controlled placement and reduced excess material.
Common Blob Sources
- High nozzle temperature: material stays runny and oozes during pauses.
- Retraction restart too high: the printer pushes too much material after travel.
- Wet filament: steam expansion creates small surface marks.
- Slow external walls: heat stays longer near the surface, especially on tiny features.
- Seam placement: a visible seam on a curved face can look like random zits.
- Power-loss recovery pauses: some printers create tiny pauses that show as repeated surface marks.
Cooling Balance: Detail Versus Strength
Cooling is not simply good or bad. Cooling helps PLA bridges, overhangs, sharp corners, and small details. Too much cooling can weaken layer fusion in higher-temperature materials. Too little cooling can cause drooping, glossy overhangs, soft corners, and messy bridges.
The useful question is not “fan on or off?” It is “what does this material and geometry need?”
| Visible Result | Likely Cooling Condition | Common Material Context | Technical Direction |
|---|---|---|---|
| Drooping overhangs | Cooling too low, speed too high, or overhang angle too steep. | PLA, PETG, TPU | Increase cooling, reduce speed, improve orientation or support. |
| Layer splitting | Cooling too high or chamber too cold. | ABS, ASA, PA, PC | Reduce fan, stabilize enclosure, review nozzle temperature. |
| Curled small corners | Local cooling shrinkage or overheated small features. | PLA, PETG, ASA | Balance minimum layer time, fan, and print speed. |
| Rough bridge strands | Cooling, bridge flow, or bridge speed not balanced. | PLA, PETG | Adjust bridge speed, fan, and bridge flow separately. |
Print Speed, Acceleration, and Volumetric Flow
Speed changes more than print time. It changes melt consistency, pressure inside the nozzle, cooling time, corner accuracy, and motor load. A printer can move fast, but the hot end must still melt enough plastic for the requested line width and layer height.
If infill looks thin at high speed but walls look acceptable, the hot end may be reaching its volumetric flow limit. If shifts happen only during fast travel, acceleration and belt mechanics deserve attention. If corners ring but layers stay aligned, input shaping or acceleration is the better area to inspect.
Volumetric Flow in Plain Terms
Volumetric flow is the amount of melted filament pushed through the nozzle per second. A 0.6 mm nozzle, tall layer height, wide line width, and high speed can demand far more melt than a 0.4 mm nozzle at moderate settings. When the hot end cannot keep up, extrusion becomes inconsistent.
Relative Sensitivity to Common Failure Areas
The bars are relative troubleshooting signals, not lab measurements. They show where attention usually goes first: warping for high-shrink materials, stringing for ooze-prone or wet materials, and layer bonding for hot, engineering-oriented filaments.
Nozzle, Hot End, and Extruder Problems
The slicer cannot fix a dirty nozzle or slipping extruder. A partial clog can create under-extrusion only at certain speeds. Heat creep can soften filament too early. A worn brass nozzle can widen extrusion and create rougher walls, especially after abrasive glow, carbon fiber, metal-filled, or glass-filled materials.
Nozzle-Related Clues
- Extrusion curls upward when pushed into open air.
- First layer has random thin sections despite a level bed.
- Infill becomes weak at higher speed while slower walls look fine.
- Feeder clicks during dense sections or long straight extrusion.
- Surface quality changes after printing abrasive composite filament.
- Cold pulls remove dark particles or burnt material.
Extruder Path Clues
Soft TPU can buckle in a loose filament path. Brittle PLA can snap if stored poorly. Wet nylon can drag and pop. A spool that does not unwind smoothly can cause inconsistent feed, especially on tall prints where the toolhead movement repeatedly changes filament tension.
Model Geometry and Slicer Choices
Some failures are built into the geometry before printing starts. Tall narrow parts amplify wobble. Long flat parts amplify warping. Thin walls below nozzle capability create missing features. Dense grid infill can build crossing ridges. Small isolated towers can overheat because each layer has little time to cool.
Geometry-Linked Trouble Areas
- Sharp corners: concentrate warping stress at the bed.
- Large flat base: increases shrinkage force across the print footprint.
- Very thin walls: may not match nozzle line width and slicer wall generation.
- Tall narrow towers: increase vibration, cooling imbalance, and collision risk.
- Dense infill intersections: can create raised lines and nozzle scraping.
- Unsupported overhangs: can curl upward and get hit by the nozzle.
Defect-by-Defect Settings Reference
| Defect | Temperature Settings | Motion Settings | Material or Hardware Checks |
|---|---|---|---|
| Warping | Bed temperature, chamber temperature, first-layer temperature. | First-layer speed, brim, raft where appropriate, cooling ramp. | Plate cleanliness, surface match, drafts, enclosure, part corners. |
| Stringing | Nozzle temperature, filament drying temperature. | Retraction, travel speed, wipe, avoid crossing perimeters. | Moisture, nozzle wear, extruder path, pressure advance. |
| Layer Separation | Nozzle temperature, chamber stability, reduced cooling. | Print speed, layer time, wall order. | Dry filament, correct profile, enclosure, material choice. |
| Layer Shift | Driver or motor overheating where relevant. | Acceleration, jerk, travel speed, Z-hop. | Belts, pulleys, grub screws, axis obstruction, nozzle collisions. |
| Under-Extrusion | Nozzle temperature, hot-end heat stability. | Volumetric flow, print speed, line width, layer height. | Partial clog, feeder gear, filament diameter, spool drag. |
| Blobs and Zits | Nozzle temperature, minimum layer time. | Retraction restart, seam placement, pressure advance, wipe. | Wet filament, nozzle buildup, power-loss recovery pauses. |
Material-Specific Troubleshooting Notes
PLA
PLA is usually forgiving, which makes it useful for diagnosing printer setup. When PLA warps, the cause is often first-layer contact, bed contamination, too much cooling near the bed, or a large flat part. Stringing usually responds to temperature and retraction tuning. PLA can also show heat creep if the hot end cooling path is weak during long prints.
PETG
PETG likes a stable melt and clean travel behavior. It can leave glossy strings and small nozzle deposits if it is too hot, too wet, or slightly over-extruded. It also sticks strongly to some surfaces, so the build plate and release method should match the printer maker’s plate recommendation.
ABS and ASA
ABS and ASA benefit from a warm, calm print environment. Their troubleshooting pattern often centers on warping, layer splitting, and chamber stability. Lowering fan speed can improve bonding, while an enclosure reduces uneven cooling across tall or wide parts.
TPU
TPU troubleshooting is mostly about controlled feeding. Slow print speed, a short filament path, modest retraction, and dry filament help keep extrusion steady. Too much retraction can stretch the filament instead of controlling ooze.
Nylon and PA Blends
Nylon can produce strong parts when dry and printed in a stable environment. Moisture changes the result quickly. Stringing, popping, rough texture, weak walls, and inconsistent extrusion often point back to storage and drying rather than only slicer settings.
When One Fix Creates Another Problem
FDM settings interact. Raising nozzle temperature can improve layer bonding but may increase stringing. Reducing fan can improve ASA strength but may soften small details. Increasing bed temperature can help adhesion but may create elephant’s foot. More retraction can reduce hairs but may grind filament or cause gaps after travel.
This is why the cleanest approach is to change one area at a time and read the surface result. A print profile is a balance of heat, movement, flow, cooling, and material condition.
Useful Order of Inspection
- Confirm the filament is dry enough for the material.
- Inspect the nozzle, extruder path, and spool movement.
- Check first-layer height and plate cleanliness.
- Confirm the correct filament profile and temperature range.
- Tune retraction only after temperature and moisture are reasonable.
- Inspect belts, pulleys, axis movement, and collisions for layer shifts.
- Adjust cooling according to filament type, not habit.
Resources Used
- [a] Bambu Lab Wiki — Model Warping, Falling Off, or Collapsing
- [b] Prusa Knowledge Base — Print Quality Troubleshooting
- [c] Prusa Knowledge Base — Filament Material Guide
- [d] MatterHackers — 3D Printer Troubleshooting Guide
- [e] Bambu Lab Wiki — Identify and Fix First Layer Issues With a Test Print
- [f] Prusa Knowledge Base — First Layer Issues
- [g] Prusa Knowledge Base — Layer Separation and Splitting FDM
- [h] MatterHackers — Layer Separation or Warping Within the Part
- [i] Prusa Knowledge Base — Layer Shifting
- [j] MatterHackers — Under-Extrusion and Print Quality Troubleshooting
